Sunday, November 20, 2011
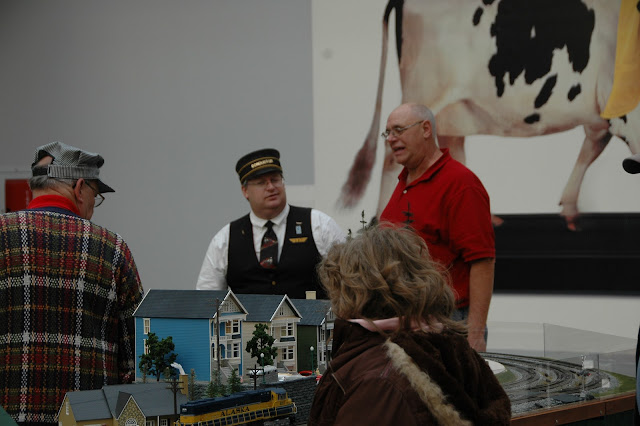
Stillmeadow Crossing Display
Stillmeadow Crossing Modular Train group displayed at West Manchester Mall yesterday. All had great fun. We had bigger crowds than Santa!
Monday, September 5, 2011
12" Scale Steam Locomotive "Kit"
At Steamtown, we walked through the shop area and found a 12" scale steam loco kit, complete with the instruction sheet!
Steamtown Railfest 2011
John and I drove up to Steamtown on Saturday for Railfest. The event was celebrating the 25th anniversary of Steamtown and the 40th anniversary of Amtrak. It was great! In addition to Steamtown's permanent displays, Amtrak brought in a P40 Genesis pulling a cafe car, 2 baggage cars and a sleeper. These housed a "museum" of the history of Amtrak. They also brought an F40PH pulling a business/inspection car.
But, the best part was watching the excursion trains in action: Canadian National #3254 Mikado, Nickel Plate #514 GP9, and a pair of Lackawanna F3s. At one moment, we stood in awe as we watched all 4 engines criss-cross in front of us. Here is the Mikado:
But, the best part was watching the excursion trains in action: Canadian National #3254 Mikado, Nickel Plate #514 GP9, and a pair of Lackawanna F3s. At one moment, we stood in awe as we watched all 4 engines criss-cross in front of us. Here is the Mikado:
Wednesday, August 17, 2011
What's the fastest way to make trees?
Well, after our StillMeadow Crossing work session, we are still not sure . . . but we finished some nice Woodland Scenics deciduous trees and we got a nice start on some conifers. Steve, Jeff and I were assisted by Scott Mingus in tree-making. Scott has a lot of landscape modeling experience from his many years of Civil War Wargaming. Thanks again, Scott.
Making Conifers:
1. Cut cedar shake into strips
2. Carve into round trunk and add "bark" with a wood rasp
3. Separate furnace filter material into thin layers and cut into circles, stars, and triangles
4. White glue filter pieces to trunk
5. Spray paint with Rustolem Flat Brown Camo
6. Spray with thinned white glue and sprinkle ground foam
 |
| Woodland Scenics Large Tree Kit |
Movin' Tracks
Saturday, August 6, 2011
Green thumb
I think that I am finally developing a green thumb. Not just because I got white glue and foam on it, either. My trees are starting to look like, well, trees.
I trimmed up and re-shaped my first bottle brush tree. Here is the final result:
OK for a start, but I wanted to try for a lighter, "wispier" look. I found a nice tutorial HERE.
I trimmed up and re-shaped my first bottle brush tree. Here is the final result:
OK for a start, but I wanted to try for a lighter, "wispier" look. I found a nice tutorial HERE.
 |
| First start with a lot less sisal rope. |
 |
| Spray with hairspray and sprinkle on 1/8 to 1/4" snips of sisal rope. This builds up the branch structure. (repeat 2 more times) |
 |
| Spray with brown spray paint |
 |
| Spray with hairspray and sprinkle on foam foliage and coarse foam (repeat 2 more times) |
 |
| The "wispier" look (Uh, more like "we're having a major drought") |
Saturday, July 30, 2011
In search of the perfect tree . . .
Here is my first and second attempt to make O scale trees. First, the classic "Bottle Brush:"
Not too bad. Maybe with a little trimming . . .
Second effort was to use dried Sedum plants to make a deciduous tree (thank you wifey for growing Sedum in our yard). I bundled and glued them together and spray painted them brown and then touched up with tan. Then sprayed everything with diluted white glue, dumped on coarse and fine green ground foam, and then repeated that about seven times. After it all dries I separated the branches and wrapped the stems with brown florist tape. All it needs now is a kid climbing it!
Wednesday, July 27, 2011
Making Plasticville less "Plastic"
As I am looking for some details for my module, I pulled out these classic Plasticville lamp posts. They have a nice look, but the base has got to go. I did the major cuts with a bandsaw:
Then cut across with a razor saw:
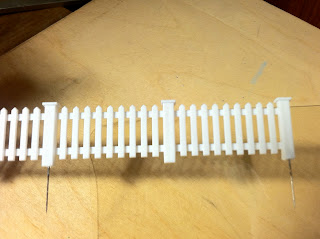
The second challenge was adapting a picket fence to a hillside. Out of the box, the pickets point sideways when you put them on a slope. The fix was to slice the pickets free from the bottom runner, and slice them partway off the upper runner.
Then cut across with a razor saw:
 |
| And finish off with a file. |
 |
| Much better! |
Now, I need to be able to mount them so that they are removable.
Just needed to snip off a pin head grab the blowtorch, and voila!
The second challenge was adapting a picket fence to a hillside. Out of the box, the pickets point sideways when you put them on a slope. The fix was to slice the pickets free from the bottom runner, and slice them partway off the upper runner.
Then bend them into a parallelogram and
super glue the bottom runner back on.
The fence pieces got the same "red hot pin" mounts:
The neighborhood just got a little more class:
Subscribe to:
Posts (Atom)


